Separating Proteins to a Blotting Membrane
Overview
Following gel electrophoresis, the separated protein mixtures are transferred to a solid support for further analysis. While it is possible to use diffusion or vacuum assisted transfer, electroblotting (Towbin et al.,1979) is the method relied upon in most laboratories, due to the speed and efficiency of transfer.
The electric field used for the transfer is oriented perpendicular to the surface of the gel causing proteins to move out of the gel and onto the blotting membrane, which sits between the gel surface and the positive electrode. The gel and blotting membrane are assembled into a sandwich along with several sheets of filter paper which protect the gel and blotting membrane and help to ensure close contact between their surfaces.
It is imperative that the membrane is placed between the gel and the positive electrode so that the negatively charged proteins migrate from the gel onto the membrane. The transfer buffer used for electroblotting is similar to gel running buffer with the addition of methanol which helps proteins bind to the blot. Electrophoretic transfer can be accomplished under wet or semi-dry conditions. In a wet transfer, the gel/blotting paper/filter paper sandwich is placed into a cassette along with protective fiber pads.
The cassette is then immersed in a buffer tank and subjected to an electrical field. With semi-dry transfer, the gel/blotting paper/filter paper sandwich is assembled on large electrode plates which generate the electric field, and buffer is confined to the stack of wet filter papers.
Transfer times vary from 1 hour (semi-dry transfer) to several hours or overnight (wet transfer). Wet transfer is usually considered to be more reliable because it is less likely to dry out the gel, and is often preferred for larger proteins. Since there will be significant variation in the chosen transfer system, it is best to consult the manufacturer of the equipment used for specific instructions.
Blotting Membranes
The solid support onto which the separated proteins are transferred is usually of two types, nitrocellulose or polyvinylidene fluoride (PVDF) membrane, both of which bind proteins with high affinity.
Nitrocellulose has been in use for a long time, and is sometimes preferred because of its excellent protein binding and retention capabilities. However, nitrocellulose is brittle and thus it is usually less effective when blots need to be reused.
PVDF demonstrates superior mechanical strength making it suitable for stripping/reprobing and for further protein characterization techniques, such as sequencing and proteolysis. Sometimes higher background staining is seen with PVDF membranes, and extra care must be taken to prevent this from occurring.
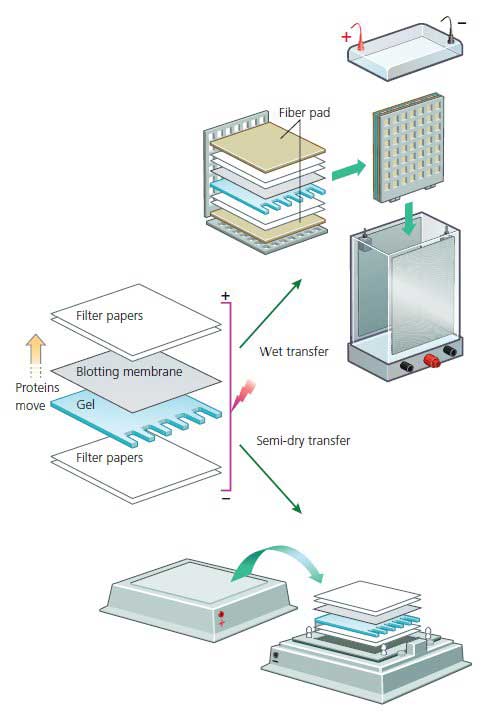
Fig. 8. Western Transfer Methods
Setting Up the Transfer
While the gel equilibrates in transfer buffer, the blotting membrane is prepared. Often the blotting membrane is supplied precut to size, or else it is precisely cut to match the size of the gel. Since oils present on the hands will interfere with signal on the blotting membrane, it is advisable to wear gloves while handling the blotting membrane. Usually a corner is marked for later orientation, though this is not necessary when using pre-stained molecular weight markers in one of the side lanes.
Prior to assembly in the transfer apparatus, the blotting membrane is prewetted. Nitrocellulose is prewetted by floating and then immersing in dH20 or transfer buffer, and PVDF is prewetted in methanol. Both types of membrane are then soaked in transfer buffer and applied directly to the surface of the gel. It is extremely important that no air bubbles are allowed to remain between the gel surface and the blotting membrane, since air bubbles will disrupt the transfer of any proteins in that area distorting the results.
Air bubbles can be easily removed by pushing gently across the surface with a spatula or rolling with a pipet. It is wise to double check the orientation of the gel and blotting membrane with regard to the positive electrode so that the proteins migrate in the proper direction.
Size of the Target Protein
The size of the target protein should be considered when choosing transfer conditions. Generally, smaller proteins will transfer out of the gel faster, and may actually transfer through the blotting membrane into the filter papers beyond. Blotting membranes with a smaller pore size can be used for small proteins and peptides, and SDS can be reduced or eliminated from the transfer buffer to improve binding to the membrane.
If there is a suspicion that the protein is transferring through the membrane, then a second membrane can be included behind the first to catch proteins that migrate through. In contrast, large proteins can be slower to elute and may be retained within the gel, so overnight wet transfer is usually preferred. Bolt et al. have developed buffer conditions which improve transfer efficiency across a range of protein sizes, including very large proteins.
Confirming the Transfer
Once the blotting step has been completed, the apparatus is carefully disassembled and the success of the transfer is evaluated. The simplest method of confirming the transfer involves noting the appearance of prestained markers on the blot as compared to the gel. However, this is only a crude measure since it provides results for a single lane.
A more reliable method of confirming transfer is through the use of a reversible stain which identifies the presence of protein bands directly on the membrane. Ponceau S, a red stain applied in an acidic solution, is typically relied upon for this purpose because it is compatible with all types of immunodetection labels and substrates.
The procedure is very simple to use and yields results in about 10 minutes. When unlabeled molecular standards are used, it is necessary to mark the position of the molecular weight standards directly on the blot when they become visible with the Ponceau S dye since they will be needed for reference at a later point. The only negative aspect of Ponceau S staining is that it doesn’t always produce a good photographic record because the bands can be diffuse.
In the accompanying stained blot, it is possible to see differing quantities of cell lysates that have been transferred along with multi-colored molecular weight markers at the far left.
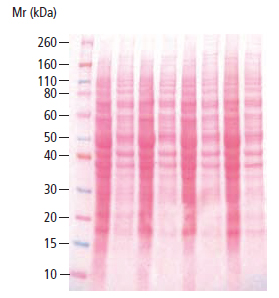
Fig.9. Ponceau S Stained Western Blot of HeLa Cell Lysates (LYS001)
There are several alternative methods that can be used in place of Ponceau S staining. One option is to use a metal ion stain, such as copper, or metal chelate stain. Another option is to stain the blot with India ink, which is very sensitive, inexpensive, and reliable. However, since India ink creates a permanent record it will obscure the signal from colorimetric detection reagents.
Coomassie Blue stain is not typically used directly on a Western blot prior to immunodetection; instead, it is sometimes used to stain the gel after transfer in order to identify what remains behind.
Popular Resources

Generate Western Blot Data You Can Trust
Best practices for image documentation, integrity, and verification.
TidyBlot Western Blot Detection Reagent:HRP
TidyBlot Reagent:HRP is a western blotting detection reagent that specifically binds to native (non-reduced) antibodies.