Popular topics

6 Steps for Success with Multicolor Flow Cytometry

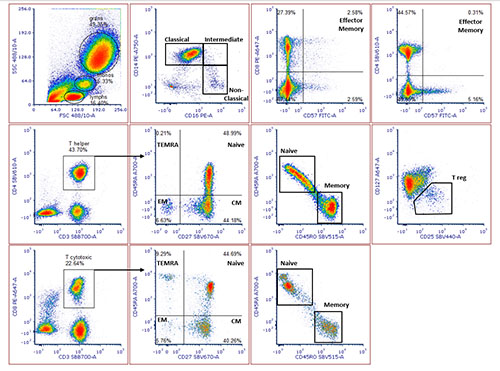
Are you new to flow cytometry and looking for tips to get started with building multicolor panels? In this blog, we cover some key considerations for panel design, and highlight handy tools to help you get great results from the offset.
1) Know Your Instrument
For best results, you need to appreciate your specific instrument’s design and any limitations to avoid generating data that you can’t analyze or interpret. Find out which lasers and filters your machine has (check the manual or ask your core lab manager) and make sure that any fluorophores that you choose are compatible with your setup.
Top Tip: Bio-Rad has an easy-to-use multicolor panel builder tool that has the laser and filter settings built-in. It is also fully customizable, so you can find the right fluorophores to use with your instrument.
2) Think about Cell Biology
You will be identifying populations of cells through their antigen (or marker) expression — meaning that it is crucial to pick suitable markers for your assays. Some cells may be easy to identify with only one or two markers while some subsets may need the use of multiple markers to aid in their identification.
Top Tip: Bio-Rad’s cell marker tools (human and mouse) can help you easily match markers to specific immune cells.
As well as picking markers that are expressed by your cells of interest, you should also consider antigen density, that is the expression level of your marker by that cell, and also think about how rare your cell population is. If you want to have good visibility of a rare population, like stem cells, you need to make sure that you pair antibodies that detect the unique markers on stem cells with a bright fluorophore. Bio-Rad’s new StarBright Dyes are ideal as they are exceptionally bright. Conversely, matching weaker fluorophores, like Pacific Blue, with highly expressed antigens can lead to better cell population resolution as it reduces issues associated with spillover and compensation.
3) Identify Suitable Fluorophores
The more markers you use, the more complicated choosing fluorophores becomes as factors such as emission wavelengths and overlapping emission spectra affect spreading and compensation. The multicolor panel builder tool can help you build complex panels, but even for smaller panels, you should try to avoid compensation and separate out fluorophores as much as possible across lasers and filters.
Your choice of fluorophore to pair with a particular marker may also be limited by commercially available antibody options, whether you need to fix your sample, and buffer choice. StarBright Dyes have narrow excitation and emission spectra, are available conjugated to a wide range of popular immunology markers, don’t require special buffers, and are not affected by fixation after staining. This makes them an ideal addition to your panels as they can help you overcome these common pain points.
Top Tip: Bio-Rad’s spectraviewer tool enables you to visualize spectra of different fluorophores and check compatibility, and now includes information about our StarBright Dyes.
4) Exclude Unwanted Cell Populations
A dump channel enables you to remove all unwanted cells in a sample by placing them in a channel that will be ignored. Stain all the cells you wish to ignore with antibodies conjugated to the same fluorophore, then exclude from the analysis.
Dead cells can lead to false positives due to increased nonspecific binding and increased autofluorescence. You can use a viability dye, like VivaFix, to exclude dead cells from your analysis. It is best practice to use a viability dye rather than forward and side scatter gating strategies as this gating strategy may not always exclude dead cells.
In addition to dump channels and live/dead staining, exclusion of doublets is also an important step to consider in your analysis. The flow cytometer cannot distinguish single from multiple cells being interrogated at the same time, potentially leading to false multiple signals detected, for example, CD3 and CD19 expression on one cell. Doublets will have double the area and width values of single cells while the height is roughly the same, they can be excluded by plotting the height or width against the area for forward scatter or side scatter. Disproportions between height, width, and area can be used to identify doublets.
5) Use Appropriate Controls
Different experimental setups will require different controls, like fluorescence minus one controls to define positive populations. Unstained cells should be used to determine background levels of fluorescence or autofluorescence in your sample and set appropriate voltages for each fluorescence channel.
Isotype controls will help you identify specific staining rather than artifacts. Fc blocking controls are important when dealing with populations with Fc receptors like macrophages, monocytes, and dendritic cells. Other examples of controls include biological controls, for staining specificity and experimental limitations, intracellular staining controls to control for nonspecific binding, and single staining and compensation controls to remove spectral overlap.
By using appropriate controls for your experimental setup, you will generate reliable data that allow you to distinguish results from background variation and any nonspecific effects.
Top Tip: if you are not familiar with flow cytometry controls, our webinar “Take control of your flow cytometry” is a good place to start.
6) Optimize Your Setup
Once you have finalized your experimental design, ensure you get great results by taking extra care when setting up your assays. Sample preparation is a key step as poor sample handling can lead to large numbers of dead and dying cells. Simple things, like whether you use a fresh or frozen sample or need to remove red blood cells, can have a significant effect on your results.
It is best practice to titrate your antibody so that you avoid nonspecific binding and minimize background. Ensure you are familiar with your instrument setup so you don’t encounter any user errors, and ask your flow core facility manager for assistance if you need training. Finally, make sure you have a plan in place for how you are going to analyze your data, before you begin, so you use appropriate gating strategies and that your panel contains all the markers you need to answer your experimental question.
Top Tip: Bio-Rad’s Flow Cytometry Basics Guide has tips and protocols for setting up flow cytometry assays. It is a handy reference guide that covers many essentials in detail.
New to Flow Cytometry?
Bio-Rad is the place to go for flow! As well as a comprehensive range of antibodies validated in flow cytometry, including the new StarBright Dyes formats, you can access resources to support your flow cytometry assays every step of the way. From short webinars to in-depth technical seminars, tools to help you build multicolor panels, and detailed protocols and guides. Our expert help and advice is designed to give you confidence with flow cytometry.
You may also be interested in...

View more Flow Cytometry or Tips&Tricks blogs


