Popular topics

-
References
Oh H et al. (2008). Neutrophil Isolation Protocol. JoVE, 17.
Walls PLL et al. (2017). Quantifying the potential for bursting bubbles to damage suspended cells. Scientific Reports, 7,15102.
Zhang K and Cheng J (2012). The regulation of integrin function by divalent cations. Cell Adh Mig, 6, 20-29.
Set Yourself up for Success with Flow Cytometry

To get your flow cytometry experiments off to the best possible start, take extra care while setting up.
Spending a little extra time thinking about your preparation will dramatically improve the quality of your results and reduce time wasted on failed experiments or numerous repeats to get publication quality results.
This blog features some of our top tips for great results and examples of good sample preparation to help you build better flow cytometry panels.
General Sample Preparation Tips
 1) Make sure you are using the right tubes: while some cytometers, like the ZE5 Cell Analyzer, will enable you to use virtually any tube for your experiments, other cytometer models will have restrictions on the type you can use. Check which tubes (round or flat bottomed and which type of plastics) are suitable for your model and avoid needlessly transferring your sample, as this will impair cell numbers. Do your cells adhere to plastics? Many cells types (for instance monocytes) show stronger adherence to polystyrene but adhere less to polypropylene. If cell numbers are low, using polypropylene tubes can help you reduce loss of these cell types. Avoid the need to use harsh methods to detach cells by choosing the most suitable plastic for your cell type.
2) Treat your sample gently: you need to ensure your cells are in an optimal condition for your experiments. Avoid unnecessarily harsh conditions that could cause them to die or generate artefacts, as this may influence your results. Carefully centrifuge samples. Do not spin any faster than required and don’t leave samples in the centrifuge; it is important to ensure your cells are not left as a pellet for any significant length of time. You shouldn't vortex vigorously; try and avoid bubbles as the surface tension of the bubbles can kill cells (Walls et al. 2017). When aspirating off your media, don’t remove all of the supernatant because cells can die in a dry pellet.
3) Prevent clumping: flow cytometry relies upon a stream of single cells to pass through the laser. Clumps will inhibit this and clog the machine, making you very unpopular with the core facility and the next user! Reduce the degree of cell necrosis and apoptosis by keeping your wash and media buffers at 4oC, if your experiment allows. To prevent neutrophil activation and formation of neutrophil NETs (extracellular traps), which can cause clumping, it is advisable to use HBSS buffer without Ca2+/Mg2+, since these ions have been shown to prime cells (Oh H et al. 2008).
Remove DNA released by dead cells by including 25-50 µg/ml DNase I in your buffer and prevent cation dependent cell-cell adhesion by adding EDTA at concentrations of up to 5 mM. It is advisable to pass your sample through a 70 µm filter prior to acquisition to remove any clumps that could block the nozzle.
4) Dissociate your sample with care: while achieving single cells suitable for flow cytometry is essential, you want to preserve the integrity of your cells by harvesting them, or dissociating the tissue in a way that does as minimal damage to cells as possible. Do you need to mince your tissue, push it through a mesh or use enzymatic digestion? To ensure optimal conditions for cell isolation, consult scientific literature and review the most suitable conditions for a particular cell type determined by other researchers. The Worthington Tissue Dissociation Guide is a great place to start as it contains a multitude of information on conditions used for a variety of tissue types, and different enzymes and isolation techniques.
If you are interested in a rare cell type, choose gentler methods where possible to preserve it. For example, neutral protease (dispase) is a gentler treatment than trypsin and commonly used to isolate iPSCs. Some cell types, such as F4/80 macrophages and follicular dendritic cells, will require enzymatic treatment to release them. Although F4/80 staining is very strong on spleen sections, red pulp macrophages are not readily released with physical treatment alone. Collagenase treatment, which cleaves peptide bonds in collagen, is required to release F4/80 macrophages. Comparably, follicular dendritic cells are only released from germinal centres with treatment with liberase and DNAse I.
Example 1: Blood Sample
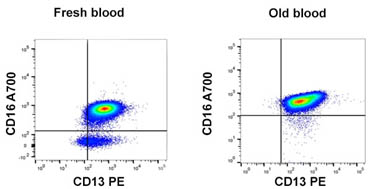
Fig. 1. Effect of time on blood sample. A delay in analyzing blood samples can have a significant effect on results. In fresh blood, eosinophils can be detected as CD16-CD13+, but these are missing from a four day old blood sample.1) Prepare whole blood correctly: whole blood should be stored at room temperature and mechanical stress, such as shaking, should be avoided. The time taken between harvesting the sample and preparation can have a significant effect on cell viability, and ultimately results (Figure 1). Therefore this time difference needs to be as short as possible.
2) Choose the right anticoagulant: most antibody staining uses the common anticoagulants like Heparin, acid citrate or EDTA but for some techniques, for example intracellular cytokine detection and detection of certain surface epitopes like integrins, it is advisable not to use EDTA. EDTA removes divalent cations that are necessary for correct integrin conformation (Zhang and Cheng. 2012). This information can be found on your antibody datasheet.
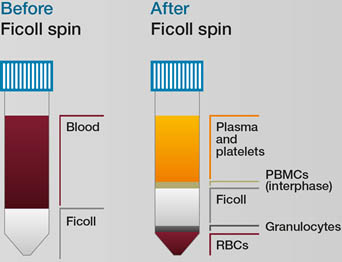
3) Removing red blood cells: red blood cells (RBCs) make up 95% of whole blood and can make detecting leukocytes difficult. You can use a density gradient, such as Ficoll or Lympho prep, to remove them. To do this, dilute the blood 1:1 with either phosphate buffered saline (PBS) or RPMI medium and slowly layer on top of the Ficoll. Then centrifuge to separate the different fractions (Figure 2). Importantly ensure the centrifugation step is performed without the brake and at room temperature.
Fig 2. Using Ficoll to isolate red blood cells. Red blood cells (RBCs) and granulocytes pass through the Ficoll layer after spinning. Plasma and platelets, and peripheral blood mononuclear cells (PBMCs) form distinct layers that can be removed by pipetting.
However, in samples that contain nucleated RBCs, such as avian or foetal samples, the nucleated RBCs will collect at the interface with PMBCs, due to their increased density.
Another method to remove the RBCs, while preserving all the other populations in your sample is hypotonic lysis, which causes rupture of RBCs through osmotic pressure. Water, ammonium chloride or specialised RBC lysis solutions like Erythrolyse (BUF04) can be used although care must be taken to ensure sufficient lysis of the RBCs without leaving the cells too long in the lysing solution, as this leads to an increase in cell death of the leukocytes.
If physical removal of RBCs is not possible, you can use CD45 staining to gate out the RBCs, as they are negative and leukocytes positive for CD45.
Example 2: Tumor Sample
1) Dissociate your sample appropriately: tumor samples are composed of a variety of different tissue types such as fat, immune cells, fibroblasts and blood vessels. Different tumor sample types require more or less aggressive methods to obtain single cell preparations. While the starting point is to mechanically break up your sample, usually with the help of scissors, scalpel or similar, many tumor samples require enzymatic, as well as manual dissociation. There is a trade-off between good dissociation and cellular damage. Trypsin is a commonly used enzyme but is harsher than collagenase, whilst dispase is a gentler enzyme, often used for isolation of rare cell populations. Review the literature to determine the best combination of enzymes to get results.
Once you are at the single cell stage required for flow cytometry, isolate tumor cells in your experiments by using cell type specific markers. For example you can use CD45 expression to exclude immune cells and exclude endothelial cells using markers such as CD31 and CD34. Our cell marker tool can help you select appropriate markers.
2) Visually inspect samples: monitor your digestion closely. You don’t want to digest longer than necessary but you need to ensure that have a single cell preparation at the end. If you still have a lot of clumps at the end of your digestion, consider vortexing remaining tissue to ensure thorough dissociation. If necessary increase digestion time or try a different combination of enzymes.
3) Remove clumps: dead and dying cells release DNA, which can cause aggregates to form. Adding DNAse or EDTA reduces the formation of these clumps. Passing the preparation through a cell strainer prior to sample acquisition further aids the removal of clumps that could block the cytometer nozzle or impair results.
4) Minimize cell death: keep cells on ice to minimize cell death, re-suspend pellets in cold buffers for the same reason.
Check the Health of Your Cells
No experiment is complete without all the pieces. Be confident that your sample prep. has worked by using viability dyes to monitor cell death. Bio-Rad offers a range of viability dyes that can be used in both fixed and unfixed samples. We also have a range of products to measure apoptosis, proliferation and autophagy.
Find Out MoreReferences
Oh H et al. (2008). Neutrophil Isolation Protocol. JoVE, 17.
Walls PLL et al. (2017). Quantifying the potential for bursting bubbles to damage suspended cells. Scientific Reports, 7,15102.
Zhang K and Cheng J (2012). The regulation of integrin function by divalent cations. Cell Adh Mig, 6, 20-29.
You may also be interested in...

View more Applications or Flow Cytometry blogs


