How to Use Flow Cytometry to Measure Apoptosis: Part Two
- Feb 19, 2021
- 4 min read
- Katie Roberts, PhD
In Part One of our How to Use Flow Cytometry to Measure Apoptosis blog, we covered the general principles of using the technique to study the apoptotic process. We also highlighted a variety of methods you can use to study apoptosis. In Part Two, we introduce selected tips to ensure that you get the most out of your apoptosis experiments.
Regardless of the choice of product and the apoptotic steps that you plan to detect, there are some factors that you should consider for every experiment. Following the guidance throughout this article will help you design robust experiments and troubleshoot existing protocols.
Controls
Including proper controls allows you to demonstrate that an effect is caused by an experimental treatment and is not an artefact of unknown variables. As well as including positive and negative controls, experiments involving a drug treatment should include a vehicle-only control. For example, if the drug was delivered in DMSO, a sample of cells should be treated only with DMSO.
Fluorescence minus one (FMO) controls are often important for flow cytometry experiments containing large panels, as they allow the user to correctly identify and gate cells. In addition, an unstained sample should be used to check autofluorescence, bearing in mind that dead cells autofluoresce. For more information, see our webinar Take Control of Your Flow Cytometry.
Titration
In addition to incubating for an appropriate length of time, it is important to find appropriate concentrations for your reagents. Some dyes or antibodies can give nonspecific signals when used inappropriately. This results in background florescence and hinders the ability to identify specific populations.
Although using the dilution recommended by the manufacturer (found on the product datasheet) can be a good place to start, performing a titration allows you to identify the optimal concentration of a reagent to use for your cell type. In addition, titration can save you money if a lower concentration is required than the one suggested by the manufacturer.
Kinetics
Apoptosis is a dynamic process that occurs over a few hours, involving activation and upregulation of different proteins over time. Detection methods will produce different results at each stage of apoptosis. It’s no good using a marker of early apoptosis at the end of the cascade. Likewise, the absence of an apoptotic marker does not mean that the cascade isn’t happening at the early stages. Polycaspase Kits are a good place to start for a general apoptosis overview (Figure 1).
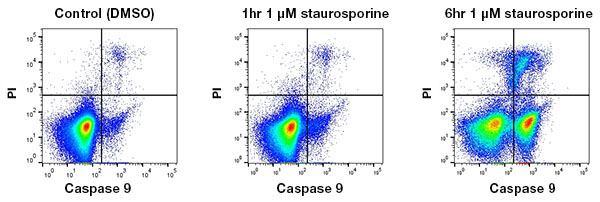
Fig. 1 Kinetics of apoptosis. Jurkat cells were treated with DMSO (vehicle control) or 1 µM staurosporine for 1 or 6 hr. Caspase-9 was detected using the SR FLICA Caspase-9 Kit (ICT960). Caspase-9 appears as a readout of apoptosis after 6 hr but is minimally detectable 1 hr after apoptosis induction.
Gating
Once appropriate gates have been established, you should keep them the same across all samples, so that you don’t analyze different populations of cells for control and experimental treatments. It is important to bear in mind that cell size, shape, and refractive index can change during apoptosis, so gates must be appropriate across all stages of analysis (Figure 2). For more information on gating, read our Guide to Gating in Flow Cytometry.
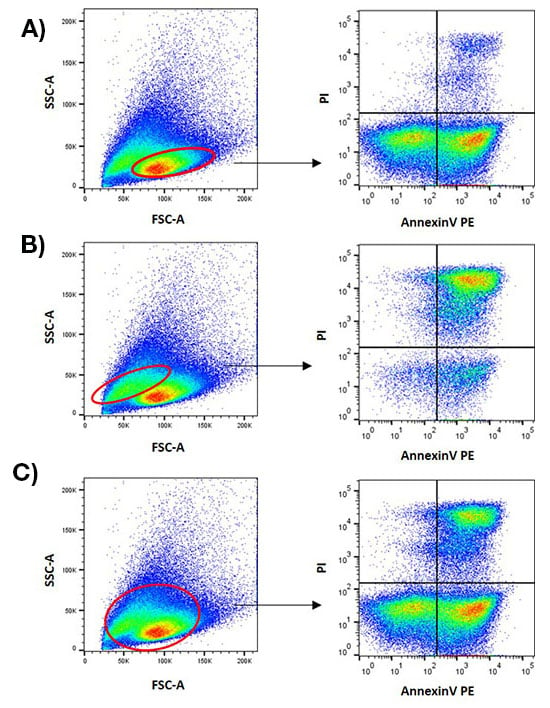
Fig. 2. The importance of appropriate gating. Jurkat cells were treated with 1 µM staurosporine for 6 hr and stained with AnnexinV PE (ANNEX200PE). During analysis, different cell populations were selected and plotted onto an AnnexinV PE against a propidium iodide dot plot to access the levels of apoptosis. The gating strategies used in Figure 2A and Figure 2B do not provide a full picture of the apoptotic population. Only the gating strategy in Figure 2C captures the appropriate cell populations.
Staining conditions
Every flow cytometry experiment requires appropriate buffers for optimal staining. For antibodies, the choice of buffer depends on several factors including whether you are analyzing surface or intracellular markers, and the fluorophores that you are using. The incubation time and temperature of the staining process should also be optimized. The binding of antibodies and dyes to cellular components is temperature-dependent, with reactions occurring faster at warmer temperatures but running the risk of overstaining.
Care should be taken to ensure that the appropriate buffer is used for any staining. Annexin V staining, for example, requires a specific buffer containing Ca2+ and is included in Bio-Rad Annexin V Kits.
Optics
It is important to choose antibodies and flurophores that are compatible with the combination of laser and filters in your flow cytometer. You can use Bio-Rad’s fluorescent spectraviewer and panel builder to help you choose a suitable combination of fluorophores. To enable flexibility, our Apoptosis Kits and antibodies are available in a range of formats. For further advice, visit the Bio-Rad Optics and Detection page.
Concluding Points
Flow cytometry is a powerful tool for studying apoptosis, and many products are available for detecting various stages of the apoptotic pathway. Care must be taken to ensure that the correct product is selected based on the dynamics of apoptotic cell death, making sure that you succeed in detecting what you aim to detect. Ideally, you should not rely on one apoptosis detection method. It is better to validate any results using a separate method too, such as confocal microscopy looking at different apoptotic proteins. Alternatively, you can look at different targets using the same application; for example, using Annexin V and a caspase kit by flow cytometry.
Want to Know More about Apoptosis?
To illustrate the different stages of apoptotic events and how to detect them, Bio-Rad has created a simplified pathway which divides apoptosis into four stages.
Download Your Copy